How to MIG weld
MIG has been the most popular
welding process for decades, for both professional welders and
hobbyists. It’s fast, strong, versatile and fairly easy for most people
to learn. Because it’s such a great process, there’s a steady stream of
newcomers determined to learn. In this article, we’ll cover the basics —
and it will be a good refresher for those who already have some welding
experience.
Let’s
start with a definition: MIG stands for Metal Inert Gas welding. In the
industry it’s called Gas Metal Arc Welding (GMAW) — but the term MIG
welding is much more common, so we’ll use that here.
Setting up your equipment
MIG
welding uses a power supply providing constant voltage, most commonly
Direct Current Electrode Positive (DCEP). The power supply uses
transformers and rectifiers to modulate line voltage, which stabilizes
the arc and provides good arc starts — as well as incorporating
circuitry to protect against overloading. A work clamp connects the
material being welded to the power supply, completing the circuit. There
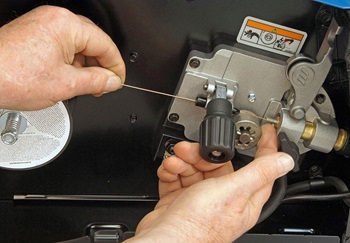
is a spool of wire, usually housed inside the power supply case, along
with a drive mechanism to feed the wire through the cable, toward the
gun.
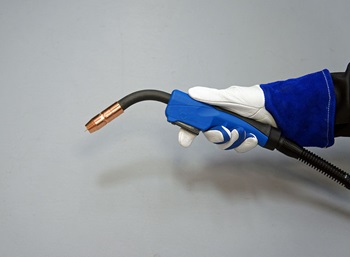
The
hand-held gun is the “business end” of a MIG machine. The gun has a
trigger that controls several functions simultaneously. Pulling the
trigger electrically energizes the welding wire and starts the motor
drive, feeding the wire automatically as you weld. MIG welding requires
the weld to be shielded from the atmosphere. This is often done by
directing shielding gas over the weld area — and the flow of gas is also
controlled by the trigger on the gun. A flux-cored wire is used for
some MIG welding applications, either alone or with a gas shield.
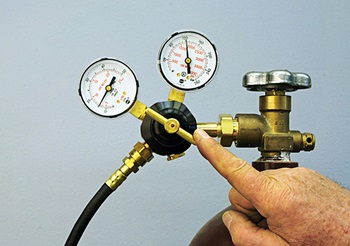
The
majority of MIG welding is done with a gas shield — carbon dioxide and
argon/CO2 mixes are the most common. The gas bottle has a regulator or
flowmeter to set the gas flow. There are many variables here, but a good
rule of thumb for light-duty welding is to use about 20 cubic feet per
hour of gas flow. Once you’ve developed some skill with the gun, you can
experiment with optimizing the amount of gas used.
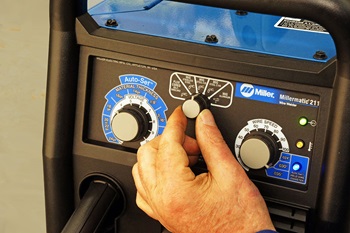
Before
making a weld, there are two essential settings that must be made on
the welder: the voltage and the wire feed speed. Nearly every MIG welder
has a chart — including my Millermatic® 211
— often just inside the hinged access cover, which gives you the
suggested settings. These are based on the material type and thickness,
and the diameter of the filler wire being used. These values are used to
adjust the settings on the face of the machine.
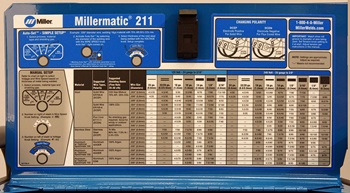
Miller pioneered the Advanced Auto-Set™ technology,
which allows you to simply set the process, the material thickness and
wire diameter, and the machine adjusts the settings automatically. This
has worked so well for me that I haven’t read a chart in years!
Best practices for MIG welding
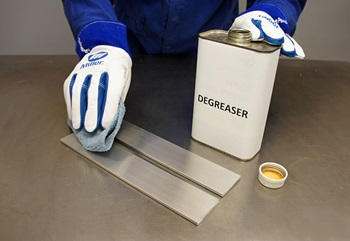
The
material needs to be clean to get a good weld, and any grease or oil
should be removed before using abrasives. MIG welding is more tolerant
of minor surface contaminants than TIG welding, but the cleaner the
metal, the fewer problems you’ll have. The best welders are quite fussy
about surface preparation, and cleaning the base metal is a good habit
to get into. I often use sanding disks or a non-woven abrasive for
cleaning rust, paint or scale off the metal.
Setting
up the machine and preparing the material is the easy part. The way you
hold and move the gun is the key that governs the quality and
appearance of your welds. Whenever possible, it’s best to use a
two-handed grip on the gun and to support your hands, wrists, forearms
or elbows in a way that allows you to move the gun smoothly, while
maintaining precise control. The position of the gun and the distance
from the gun to the work are crucial.
The
farther the gun is held from the work, the farther the wire has to
extend to meet the metal being welded. The length of the wire between
the gun and the base metal is called the stickout
and has a BIG effect on the quality of the weld. Normal stickout is
usually around 3/8 inch. If you allow the gun to creep farther away from
the metal it increases the stickout, which puts less heat into the
metal and can decrease the coverage of the gas shield.
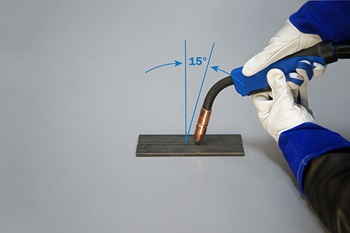
I
normally push the puddle when I weld. Since I’m right-handed, that
means the motion of the gun is toward my left. In most cases, the gun
should be angled slightly in the direction of motion. This is called the
travel angle, and 15 degrees is a good place to start.
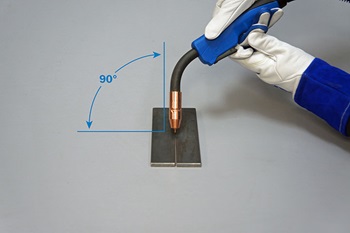
Looking
at the gun from the end of a seam, the angle of the gun to the work is
called the work angle. For a butt joint, 90 degrees is ideal.
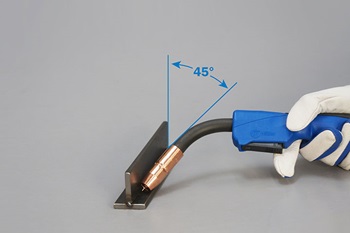
For
a 90-degree fillet weld, the gun is normally held at 45 degrees,
although this may need to be modified for thin metals. If a fillet weld
is configured as an inverted T (like the photo below), the horizontal
portion can dissipate heat on both sides of the weld. The vertical
element ends at the weld, so it can’t dissipate as much heat; this
sometimes causes burn-through. Angling the gun slightly away from the
vertical element will help in situations like this.
The
speed you move the gun is very important too. Going too slowly builds
up an oversized bead and going too quickly may diminish penetration.
Some welders hold the gun steady as they progress along the joint, but
there are a variety of techniques for weaving or oscillating the gun
that may be beneficial. There are no hard-and-fast rules here and I
encourage you to experiment with subtle changes in the way you move the
gun, paying close attention to how each change affects the weld. You can
learn a lot by talking to and observing other experienced welders.
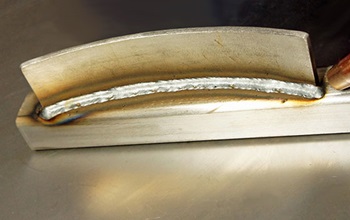
So
how do you judge the quality of a weld? Ideally, the weld bead should
be slightly crowned, with the toes or edges of the bead flowing nicely
into the base metal. There should be full penetration, but not so much
that there is excessive bleed-through on the back of the joint. The
width and height of the bead should be fairly consistent from one end to
the other, and there should not be any craters or voids in the weld
bead. Many people test their practice welds by holding a welded part in a
vise and bending the joint until it breaks. Ideally, the metal NEXT to
the weld should fracture before the weld bead does.
It
takes a lot of practice to get your welds to meet all these criteria —
but the more time you spend with your helmet down, carefully coaxing the
gun along its path, the better your welds will get!
Additional resources
With
support from Miller, I made a 70-minute video titled “MIG Welding Made
Easy.” This video gives comprehensive coverage of the points listed
here, plus a great deal more. This is available to stream or download
from my website:
https://covell.cinevee.com/mig-welding-made-easy